- HubPages»
- Technology»
- Computers & Software»
- Computer Science & Programming
Lesson 1 : Getting Started with C++ Programming

1.1 Before you Begin
Before you start programming in C++, you need to have a compiler.
A compiler is a program that converts your source code into machine code or object code. Source code is the code that you write, in this case, in C++. The machine code is the actual binary (1s and 0s) that the computer can understand.
Source code is typically human-readable, meaning that, not surprisingly, it is easier for people to read than machine code.
Figure 1.1-1 : How a Compiler Works
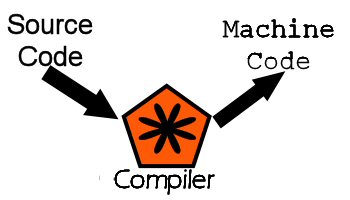
If you look at Figure 1.1-1, you can see how a compiler works visually. The best way to think of a compiler is to think of it as a machine, with input and output.
The input to the compiler is the source code. The output is machine code that the computer can execute.
Figure 1.1-1 is a perfect example of a technique used in computer science called black boxing or abstracting a program or piece of software. A compiler is significantly more complex than the diagram indicates, but to learn the basics we aren't concerned with all the details of how the compiler works, just what it does.
Most compilers, especially those on Windows, come packaged in a larger program called an Integrated Development Environment, or IDE. For this particular set of tutorials, I will assume you are using Windows. The concepts behind C++ itself will be platform agnostic, that is, it does not matter essentially if you are using Windows, Linux, Macintosh, or Unix. So this set of tutorials will be useful regardless of what platform you are on.
An IDE (keep repeating to yourself, "Integrated Development Environment") typically consists of, at bare minimum, a compiler/linker, and a text editor. While you can type all of your source code in common text editing programs like Notepad, or Wordpad, it is nice to have a text editor bundled with the compiler.
This is where the integrated part of IDE comes in. The text editor and compiler (as well as a bunch of other bells and whistles we won't concern ourselves with now) are integrated together as part of the overall program.
Where do I get an IDE?
You can download an IDE from the web (some for free, some for purchase) or buy them at a store.
Two of the most common IDEs that you will run into on Windows are:
- Visual Studio (the Express editions are available for free on Microsoft's website)
- Dev-C++ (downloadable for free at http://www.bloodshed.net/devcpp.html)
Visual Studio itself comes in many flavors. The most recent as of this writing is Visual Studio 2008, with Visual Studio 2010 in development. I prefer Visual Studio 2005. Most of the images and code samples in this tutorial have been compiled in Visual Studio 2005 SP-1 (service pack 1), but should be compatible with Dev-C++.
Dev-C++ is available for free, and is a very popular product. Each major release of Visual Studio is also divided into subcategories, which usually include an Express edition. This edition is not as powerful or as optimized as the Student, Professional or Enterprise editions, but is free to download and should be fine for individuals who are just learning.
1.2 Taking your IDE for a test-drive
After you download an IDE, it takes a while to become familiar with the environment. However, this is true of any program, like Microsoft Word, Internet Explorer, or even Notepad. Everything has a learning curve, and you just have to stick with it and practice.
We will be using Visual Studio 2005 SP 1 for the examples in this tutorial. To start a new project in which to code, go to File --> New --> Project.
Figure 1.2-1 : New Project in Visual Studio
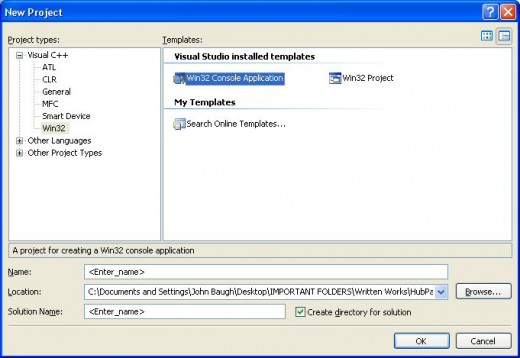
Figure 1.2-1 shows the New Project screen in Visual Studio 2005. There are a few steps you must accomplish before you begin programming.
- Select the appropriate type of project under "Visual Studio installed templates" as shown in Figure 1.2-1. For our project, we just want a Win32 Console Application.
- Name the project something meaningful, in the text box next to the "Name:" label. For the name, let's put something like Lesson_1_1 or something meaningful.
- You can select the appropriate location to save the project by clicking "Browse..." or by manually typing the location.
When you have accomplished the above tasks, click the OK button.
Figure 1.2-2 : Visual Studio Opening Page
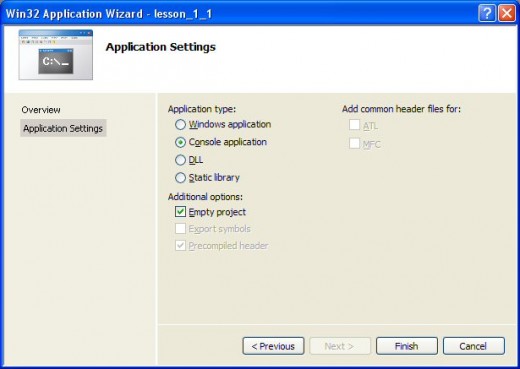
In Figure 1.2-2, you see the Application Wizard. There are two options to the left:
- Overview
- Application Settings
The overview does just what it says. It gives an overview of the application.
Click on "Application Settings" and make sure you check the "Empty Project" box near the bottom. Your settings should look like those in Figure 1.2-2. Also, make sure it is set to "Console Application".
Figure 1.2-3 : An Empty Project
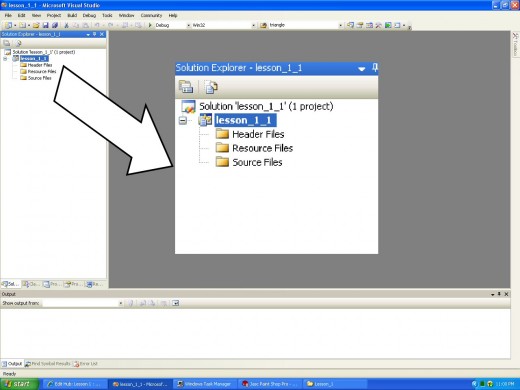
Figure 1.2-3 shows a solution with an empty project in it. Note that the arrow and enlarged image of the project list is not part of what you will actually see, but is simply enlarged so you can read it.
A project typically has 3 directories (folders) inside of it:
- Header Files
- Resource Files
- Source Files
For right now, we will not concern ourselves with the first two. We are more concerned with the source files.
Our next step before we actually compile and run our first program is to add a source file to the project. There are a couple ways to do this. The best way (in my opinion) is to:
- Right-click the Source Files directory
- Click "Add"
- Click "New Item"
Once you have done this, you should see the screen below (or something very similar).
Figure 1.2-4 : Add New Item
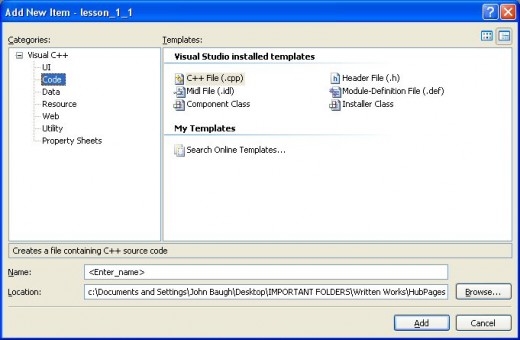
To add a new source file, as we see in Figure 1.2-4, you must ensure you are in the "Code" subsection under Visual C++. Then, within this subsection, make sure that "C++ File (.cpp)" is selected.
And, just as you did with the project itself, you should change the Name of the file. Let's call it "main.cpp" or just "main". If you just put "main", it will add .cpp to the end of the file. This is the file's extension, in this case, .cpp indicates that the file is a C++ (C plus plus) file.
Once you have done this, click "Add".
1.3 Your First Program in C++
Thus far, we have learned:
- How to create a project in Visual Studio 2005
- How to add a new source file
Now, we're going to write our very first program. Click in the test editor and type the following code:
#include <iostream>
using namespace std;

int main()
{
	cout<<"Hello, C++"<<endl;
	return 0;
}
Now, just to see what the program does, you must do two things:
- Build the project
- Run the project
Building the project is essentially compiling the source code into machine code, as we described earlier. This is accomplished by clicking : Build --> Build Solution, which compiles the entire solution, or by clicking Build --> Build lesson_1_1.
After you have built the project, you should see in the "Output" screen that there are no errors or warnings. If your project built successfully, then you should be able to run the program.
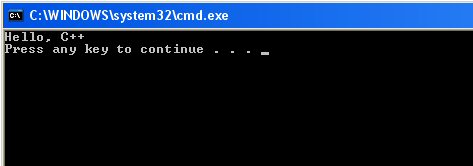
To run the program, click Debug--> Start without Debugging. When you do this, you should see the console output below:
Figure 1.3-1
1.4 The Anatomy of Our Program
Figure 1.3-1 shows what the output from our program looks like.
Note that the "Press any key to continue" portion of the display is not actually part of the output from the program.
The first two lines of the program involve the inclusion of a library:
#include <iostream>
using namespace std;
In a nutshell, libraries are collections of functionality that have been written for reuse by programmers. In the case of the iostream library, the ability to perform various input operations and output operations have been provided.
When determining if an operation is input or output, you have to think like your program. Be the program. While this may sound like some cheesy meditation exercise, it is truly the best way to describe how to determine input vs. output.
Data input is the process by which information is transmitted from outside the program to inside the program. An example of this would be when the user types something, and the program receives the characters that were typed. This is input because the information came from outside the program (the keyboard), and went into the program.
Data output is the process by which information is transmitted from the program to somewhere outside the program. In relation to our program in Figure 1.3-1, our program sent output to the console (the black screen that popped up when you ran the program). Other examples of output would include sending data from a program to a printer, or from a program to an automated CAD/CAM system to manufacture an item. There are many other examples.
After the first two lines, we have the body of the program in a special function called main(). We will learn about functions in a later tutorial, but for now we can think of them as self-contained sets of instructions. In every C++ program we will be dealing with, we will have, at very least, a main() function.
The main() function is the entry point. In other words, it is where the program starts. In our program, main() looks like the following:
int main()
{
   cout<<"Hello, C++"<<endl;
   return 0;
}
The int is a keyword, indicating that the return type of our function main() is an integer. Recall that the set of integers consists of the whole numbers and their negative counterparts (... -3, -2, -1, 0, 1, 2, 3, ...) We need not concern ourselves too much with return types yet, and for now, you just need to know that when you are done writing your main() function, you must type return 0; This is the signal to the program that your main() function is done.
The most peculiar (and arguably, most interesting) part of our program is:
cout<<"Hello, C++"<<endl;
Without going into much detail, cout is short for "console output", and is provided by the iostream library that we discussed earlier.
You follow cout with two less than signs, <<, which is called the stream insertion operator. After this, we put a string inside of quotes. A string is a collection of one or more characters. In our example, "Hello, C++" is a string. And finally, we have the stream insertion operator again, and then the endl variable, followed by a semi-colon (;) to indicate the end of the statement.
The endl variable stands for "end line". It causes a new line to occur after the string.
1.5 Summary and Conclusions
In this lesson, we went through an extensive exploration of what is needed to develop a basic program in C++. While we learned how to create a project in Visual Studio 2005, other compilers should be somewhat similar.
Key words and concepts that you should know before further exploration of C++ are:
- Compiler
- IDE
- Source code
- Machine code
- The main() function
1.6 Practice Exercises
-
Define what a compiler is and explain what it does.
-
If you remove the <<endl statement from
cout<<"Hello, C++"<<endl;
and simply leave the semi-colon, so that the code is
cout<<"Hello, C++";
how is the output different?
3. Play around with the code and change the "Hello, C++" string to contain your first and last name.
Go to Lesson 2 : Basic Variables, Calculations, and Comments
- Lesson 2: Basic Variables, Calculations, and Comments in C++
Lesson 2 goes through the primitive built-in variables and calculations. Additionally, comments are described.


